


Ya’ll, I’m about to give you the easiest thing to build ever that will result in years of outdoor fun with your family. This DIY outdoor movie screen framing is something we built in just a few hours, and I promise you can do it too. So let’s get started!

Why you’ll love this project
- Versatile: With this DIY projector screen, there are no worries about it hanging out in your backyard for years to come because the screen is removable!
- Easiest Project Ever: I am not one to overthink things. So I bought a super cheap projector screen on Amazon for like $23 ya’ll. So the only “building” you have to do is the super easy frame pillars, which don’t even require any cuts.
- Family Fun: Since building this outdoor projector screen DIY, we have used it countless times to watch my kid’s favorites!
- Host a Party: Not only do we watch with the family, but this homemade projector screen has allowed us to host neighborhood parties and birthday parties!
If you love this easy build project, here are a few more you may like as a beginner DIY’er: How to Build a DIY Concession Stand for Family Movie Night, DIY Easy Peezy Console Table (TUTORIAL), Build a DIY Tilt-Out Laundry Hamper {FREE PLANS}
Why I’m doing this project
Over the weekend we wanted to do a movie night but it was too late to get a stand from Amazon so we decided to do this quick project and make an outdoor movie screen ourselves. When I tell you this is the easiest project ever y’all, it really is! Here are the deets:
Materials Needed
This post contains affiliate links.
- 2 – 4x4x8′ Pressure treated wood posts
- 2 – 50 lb. Bags of Quikrete cement
- 2 – Large Planters
- 1 – Bag of potting soil
- 1 – Bag of gravel (optional)
- 2 – Solar light caps
- 1 – Post level
- 1 – Movie screen
- 1- Projector
- *Flowers (optional)
Once you gather your materials, it’s time to get started. We already had a screen and projector. The other items probably costs around $50 in total (not including the flowers)
Tools Needed
- Hammer
- Gardening trowel (optional)
Cut List
- NO Cuts Necessary!!!
Variations/ Adaptations
Use PVC pipe: If you want to be able to take the DIY projector screen stand down, you could replace the wood beams with PVC Pipe. Using PVC you would be able to connect the pieces without gluing or screwing them together, that way you could easily dis-assemble the frame and store it until the next use.
Use pillars for something else like hanging a flag: These wood pillars are versatile. When the DIY movie screen is not hanging on the frame, you could hang other things from the attachment hooks like hanging planters, sting lights, or yard flags.
Add Vining plants: Instead of flowers, consider planting vining plants in the planters that can grow up the wood pillars to decorate and disguise them.
Use existing pillars: If you have existing pillars or a structure like a gazebo or pergola, you may be able to attach the screen to that structure instead of creating your own structure.
Use it indoors too: If you buy this pre-made movie screen, you can use it indoors as well. It comes with removable hooks you can use on a wall. That way if the outdoor movie get rained out, you have another option!
Other Outdoor Movie Screen Ideas
Maybe you don’t want to buy a movie screen, or you don’t want to wait for the delivery of a pre-made one. Instead, you could also use a large drop cloth, white sheets (doubled or tripled up so they are not as transparent), or white curtains as a screen. However, the image will not be as crisp as the image on a screen actually made for projecting movies.
How to Make A DIY Outdoor Movie Screen
- Add a post level to your 4×4 post. This will help ensure your post is level when the cement is drying. We just used a rubber band to attach it (Image 1).
- Grab the first planter and a bag of cement. Make sure you wear a mask and safety glasses when pouring the concrete mix. Have a helper hold up one of the posts inside the planter while you pour the bag of cement in (or vice versa) (Image 2).

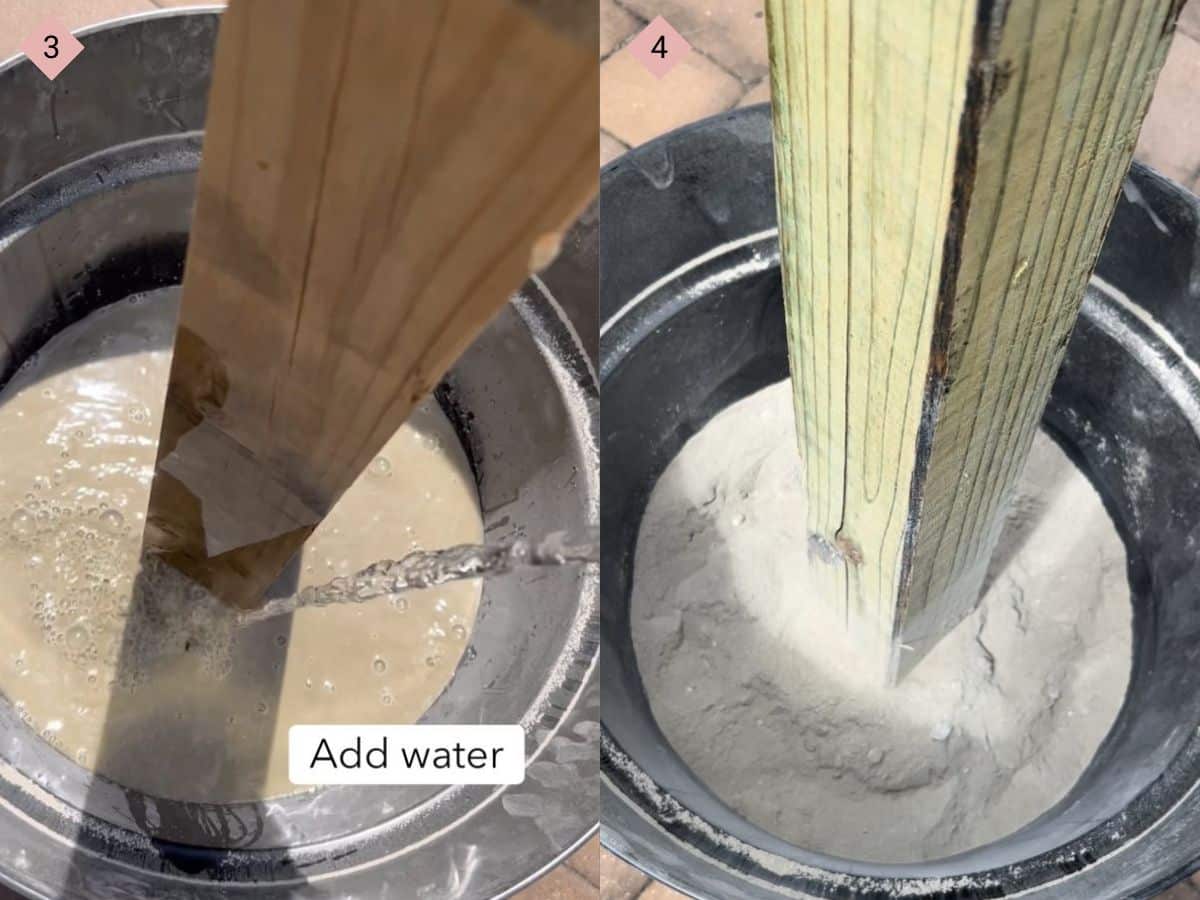
3. Add 1 gallon of water to the concrete mix in the planter (we emptied out an old milk jug and used that). Mix it around a little so it is well combined (Image 3).
4. Let it sit and dry. The bag says it takes 20-40 minutes. We waited the entire 40 minutes just to make sure. As it dries, double check a few times that the post is still level (Image 4).
5. Add the solar light cap to the first pillar and secure it (Image 5).
6. Repeat step 5 for the second pillar, adding and securing the light cap (Image 6).

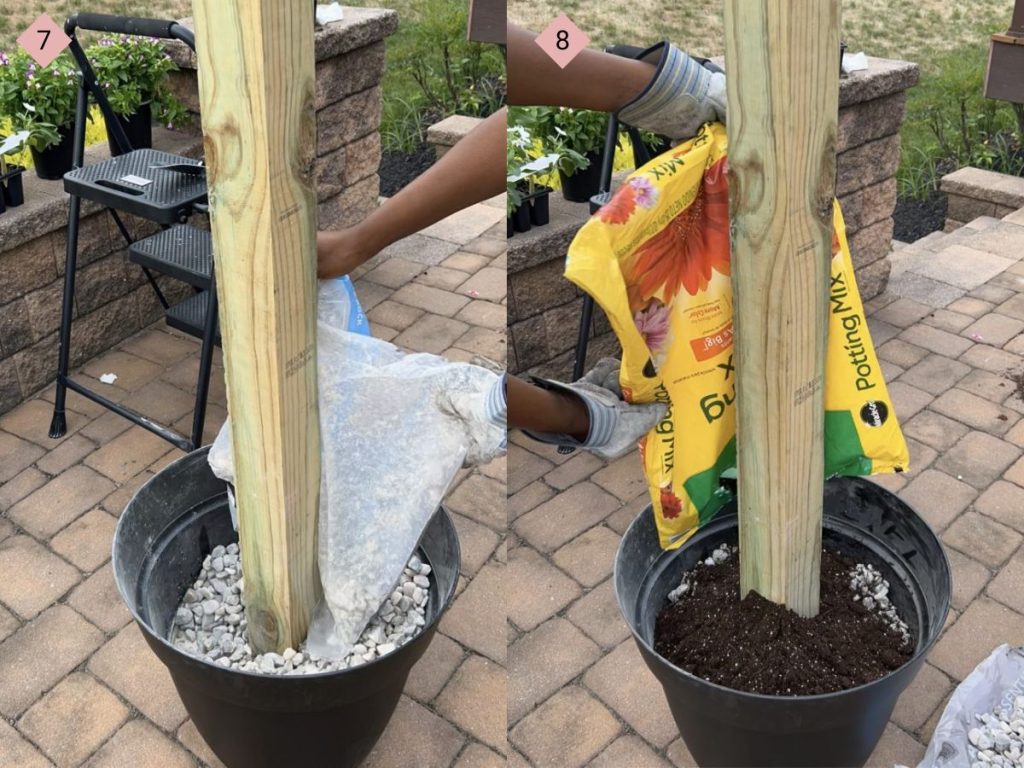
7. Add a bit of gravel to the top of the dried Quikrete but leave room for the soil (Image 7).
8. Add the potting mix on top of the gravel, filling to about an inch from the top of the planter (Image 8).
9. Plant what you like around the post. I chose what was available at the end of summer here in Philly (Image 9).
10. Attach the pre-bought movie screen and VOILA! You have a diy outdoor movie projector screen (Image 10)!

Sprucing up your outdoors? Here are some outdoor projects you may love as well: How to build a Porch Planter Box, How to Make A Flower Box Welcome Sign DIY {Perfect for Beginners!}, How We Built a DIY Grill Station Outdoors
Tips for Best Results
- Make sure you use a level.
- Purchase a screen for better image quality instead of trying to make your own.
- Trade out the nails and hooks that come with the pre-bought movie screen for stainless steel screw hooks. They will hold up better in the weather and last longer.
What is the best projector screen for an outdoor projector?
While you can make a diy projector screen out of several different materials and fabrics, I realized that it actually cost me less money and gave me a better quality screen to just buy one on Amazon. The best screens need to be pulled tightly and have no wrinkles, which is difficult to do with some thing like a sheet or tarp. The movie screen I bought created a great image from the projector, was easy to put up, and was easy to take down.
What is the best projector for an outdoor movie night?
There are plenty of great outdoor movie screen projectors on the market. The one we bought was this 4K 1080P HomPow Outdoor Portable Movie Projector and absolutely love how easy it is to sync with our Bluetooth to play movies straight from Netflix or Disney Plus. I got it on a Prime Day sale, but normal price can be a bit more.
However, a cheaper version that I have also heard really great things about is this Mini Projector with WiFi and Bluetooth capabilities. It is also 4K 1080P, but it is a fraction of the price. (Honestly, had I done more homework I probably would have bought this one;)).
FAQs
Can you use a white sheet as a projector screen?
You can absolutely use a white sheet to project a movie. Be sure to double or even triple the sheet so it is not as transparent. Keep in mind, the image of the movie may not be as crisp as if projected on an actual projector screen, but if you are okay with that, a white sheet is a great low cost option.
Can I make a DIY movie screen?
Yes! The hard part is building the frame for the outdoor projector screen (although not if you build this one because it is super easy), but once that is finished, there are several materials you can use as a DIY movie screen. Here are a few: A white tarp, a white sheet, a white curtain, white or light colored fabric, or even just a wall. In all these cases, the best results will come from making sure the material you use is pulled taunt and has minimal wrinkles.


I love this, I’m making mine this evening!
Such a brilliant project! Can’t wait to do mine
What a great idea for outdoor movie screen