


Transform your front porch with my step-by-step guide to building a stylish DIY planter box with your house number. This is a great way to elevate your porch, so let’s get started!

Why You’ll Love This Project
- Beginner Friendly: This flower planter is the perfect project for a beginner because it uses materials that are easy to manage, and very few power tools are needed.
- Done in 1 day!: This is a super fast project, so you can have your front porch dressed up in less than 1 day!
- Pretty: I love porch flower boxes. They really make a home look beautiful and help welcome guests as soon as they show up on your porch!
- Customizable: This simple DIY planter box is made of wood, so it is easy to customize the color and if you are handy, you could probably even customize the shape.
Looking for more outdoor projects to do? You may like my: Flower box Welcome Sign, How To Make A DIY Projector Screen Frame {for outdoor movies!}, How To Build A DIY Grill Station Outdoors
Why I’m doing this project
I had been looking for a unique way to elevate my front porch. Yes, I could go buy a normal planter and add some flowers, but you know me, I like giving things my own flare. I looked up loads of different front porch planter box ideas online, but in the end, I finally came across an unfinished style I liked while out shopping. So it inspired me to make one myself. This is a perfect beginner level project so don’t be intimidated at all if this is your first time trying your hand at woodworking.
Materials Needed
- 1 x 12 x 8 ft long common board wood
- Paint of your choice
- Stain (I used Minwax in Ebony)
- Exterior Paint
- Thin trim moulding (optional) I used 1/2″ thick
- Wood glue
- House Numbers (Can be purchased from Home Depot, Lowes, Amazon, etc)
- Spray paint (not necessary if you purchase house numbers in the color you want)
- Wood filler (to fill the nail holes before painting)
Tools Needed
- Miter Saw (Home Depot or Lowes can do many of the cuts for you)
- Hand or electric sander
- Brad Nailer and nails (1-1/4 or 1-1/2 inch long)
- Paint Brush
- Stain Applicator Pad
- Miter
Cut List
- You will cut your 1×12 into the following:
- 1 piece @ 4 ft
- 3 pieces @ 11-1/4″ wide x 12″ high
- 1 piece @ 11-1/8 x 9-3/4″
Variations/ Adaptations
- Paint the base a different color to match your house better.
- Stain the house number board a different color.
- Make it a “Welcome” planter box instead of a house number planter box by adding the letters for the word “Welcome” in place of the numbers.
How to Make a DIY Planter Box
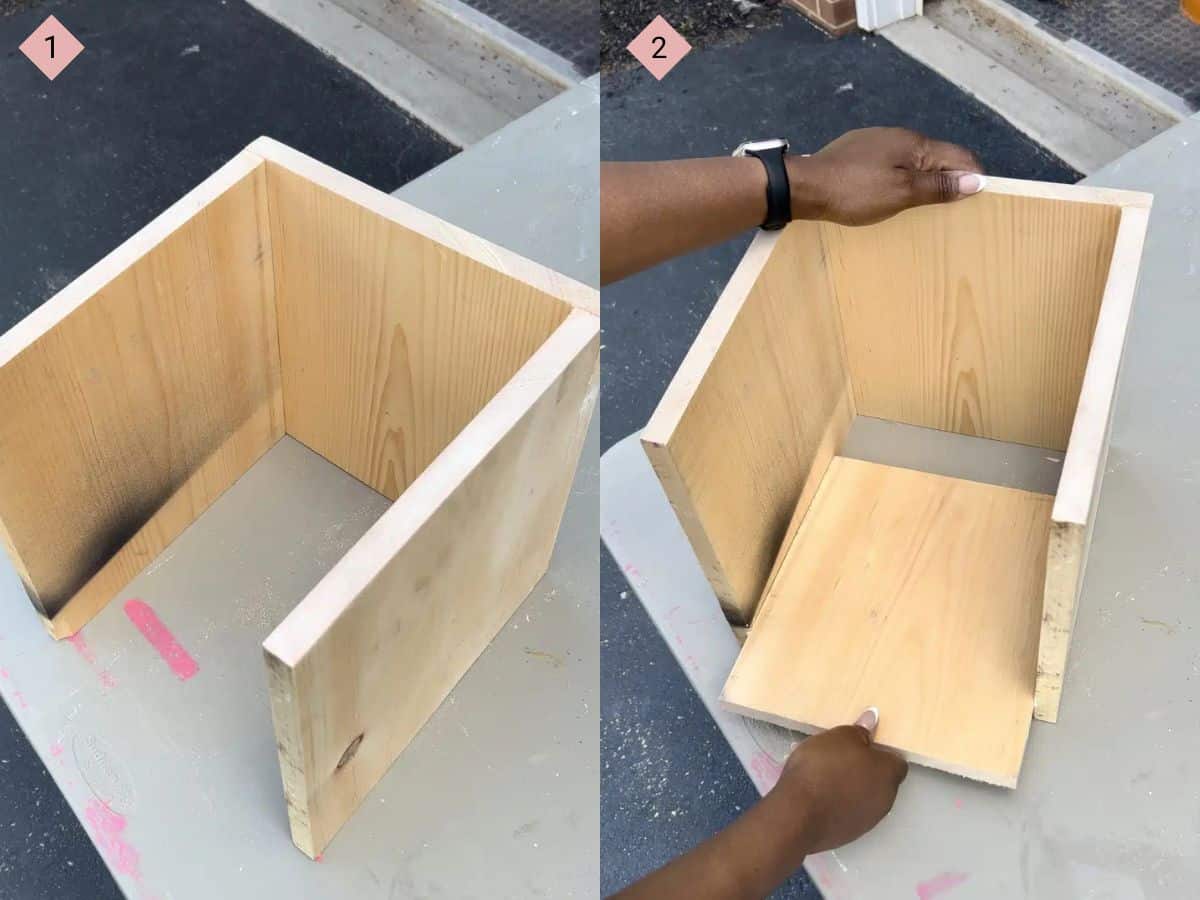
- After cutting all the wood on the cut list above (or having it cut for you at your local home improvement store), you will to get the three 11-1/4″ pieces and attach together using a brad nailer and wood glue. The wood glue really does all the work keeping the boards together, the nails are just to hold the boards in place while the glue dries. So put a good number of nails in it. Remember, to make sure the pieces line up (Image 1).
- Next add your bottom to the box by attaching the 11-1/8 x 9-3/4″ piece of wood. Use glue for that as well and attach on 3 sides with brad nailer. The box should only have 3 sides at this point. Fill all your nail holes using wood filler, sand down, and then paint your planter box whichever color you want. I used black. If you’re using trim pieces around the address sign on the planter, paint that the same color as the box.(Image 2).
3. Stain your 4ft piece of wood that you will be adding the house numbers to using a stain applicator sponge. You can make the stain as dark or light as you want depending on how much of the wood grain you want to be able to see (Image 3).
4. Now, it’s time to attach the painted planter box to the stained address piece with wood glue and a nail gun (Image 4).

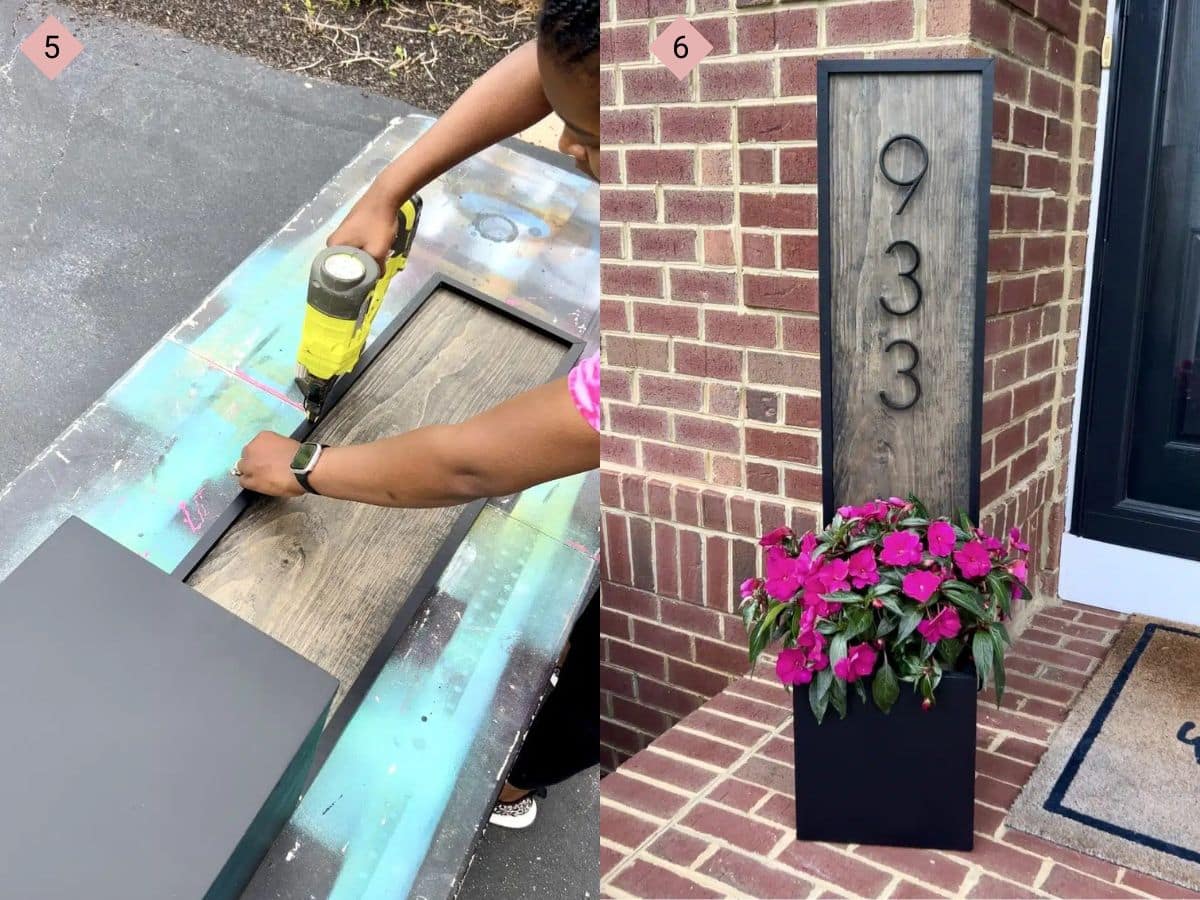
5. Once the box is attached to your stained 4 ft piece of wood, you will add the moulding trim around the edges if you choose. I did miter cuts on my trim but it’s not necessary (Image 5).
6. Add your numbers using the nails that come with the numbers, add potting soil and flower to the planter box, and you’re all done! (Image 6).
Want to elevate the inside of your house as well as the outside? These beginner projects may be perfect for you: DIY Easy Peezy Console Table (TUTORIAL), How to Upholster a Bench DIY {Easy And Beginner Friendly!}, DIY Closet Makeover with Lilac Lane by Valspar
FAQ’s:
What kind of wood do you use for a planter box?
For this diy flower box project, I just used common wood, but if you really want it to hold up outdoors, it is best to use MDF, Redwood, Cedar, or Pine. If yours will sit under a covered porch, using common wood may be okay. You can also finish it off with a coat of exterior polyurethane to protect it.
Should you line a planter box with plastic?
For a large planter box, it may be beneficial to add a plastic liner to help protect the box from water damage. However, for this simple diy planter box project, I did not add a liner because the box is already very small and a liner would just be difficult to add.
Do planter boxes need drainage holes?
Yes, drilling drainage holes in the bottom of diy planters is beneficial for making sure the soil does not become waterlogged. I ended up just dropping a flower pot I purchased right in.
No green thumb, no problem. To eliminate the need for holes altogether, you can also easily pop in realistic looking faux flowers too!
Let’s Connect!
If you would rather watch this tutorial than read about it, then you can check out this project on Instagram!
You can also find me on Facebook, YouTube, Instagram and TikTok!


Read the Comments +