


Looking for a quick and easy project to take your fairytale princess party over the top? Then you should try making this Once Upon A Time Backdrop that I made the same day as my daughter’s princess birthday party! The project is super beginner friendly and it makes the perfect DIY princess party decoration for your little princess!

One Handy Momma is a member of the Amazon Affiliate Program meaning I may receive a commission if you click a link and make a qualifying purchase at no additional cost to you.
Why you’ll love this project
- Affordable: All you need is some MDF or foam board and a storybook banners from Amazon, making this a super inexpensive way to decorate for a party. just like this Sephora Backdrop I made.
- Quick: Did I mention I created this book backdrop on the same day as the party? So yes, it is super fast to make ya’ll! Another fast project you could try is this Champagne Wall for New Years!
- Easy: This storybook backdrop is one of the easiest projects I have ever done. All you need is some boards and spray adhesive!
- Super Special: This once upon a time book backdrop is what everyone will be talking about from your party… because I know they were talking about it from mine!
Why I’m doing this project
Materials Needed
- Two Pieces ¾ inch MDF (you can also use wood, it’ll be lighter than MDF)
- Backdrop banner – I chose this banner because I felt like it really went with my theme well. Plus, it was a really reasonable price considering how large it is.
- Spray Glue: This particular brand of spray glue is the one I use for any project I do that needs it. It tends to keep my projects in tack really well.
- Door Hinges: I used 2 of these but I would suggest using 3 if you can (I only had 2 on hand so I went with that). These door hinges were super affordable which I thought was fine since they really only needed to hold up until the end of the party. However, I found that they were nicely made and durable should I want to reuse them for a different project down the line like I did for my foldable cart.
Tools Needed
- Circular Saw (this is needed if you plan to cut the MDF/wood yourself. Don’t forget, you can get your MDF/wood cut at Home Depot or Lowe’s as well.)
Cut List
- Cut your banner straight down the middle and measure each side.
- Cut MDF/wood to the size of the banner for each side
- For reference, my measurements were 46-⅝ inches x 71 inches tall and on on side and 47 ⅝ inches x 71 inches tall for the other side. Slightly different but but no one could tell 😉 But be sure to measure what you have to be on safe side.
- REMINDER: Don’t go by the dimensions listed on the Amazon listing for the banner. It wasn’t 100% accurate. That’s why it’s important to measure each side yourself after you cut the banner down the middle.
Variations/ Adaptations
- This project is super customizable! If you are having a super hero birthday party, then you could switch out the Once Upon A Time banners with Super Hero banners.
- Another great idea I have seen is to make it more “whimsical” by adding vines and flowers. I didn’t have time for that, but the ones I have seen look really nice.
- You can also trade out the MDF for Foam Board to make the project even lighter and more affordable.
Here are a few of the other Fairytale banners I felt would have also worked really well for this project:
This Purple Flowers and Butterflies Once Upon a Time Backdrop was a close second since my girl loves purple.
Before I narrowed the theme down to Once Upon A Time, I thought about having this Castle Banner be my backdrop.
And while I was looking for princess themes, I also came across this Super Hero backdrop that would have been perfect for my son’s birthday party!
How to Make a Once Upon A Time Backdrop
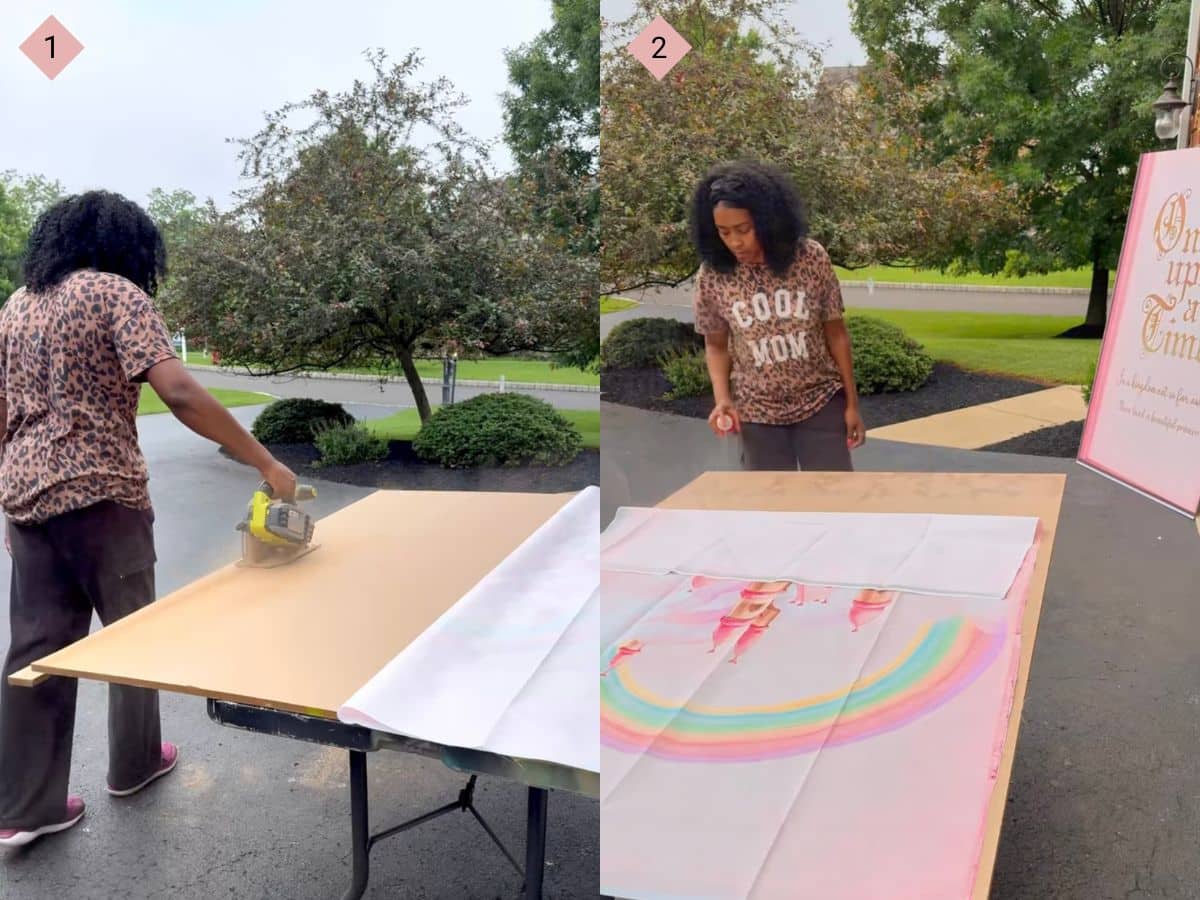
- Cut your MDF to the correct size for each side of your banner (Image 1).
- Spray the MDF with spray glue in small sections and spread the banner over the glue section with your hands making sure to get it as smooth as possible (Image 2).
- Continue to glue down the banners on both sides until you are finished (Image 3).
- If you choose to, spray paint the hinges (Image 4). I had black on hand but I linked gold hinges above.

- Places both pieces of your storybook side by side and attach hinges to the MDF and voila! You have a DIY storybook backdrop ready to set up!
- Enjoy taking plenty of photos in front of this Fairytale Book Backdrop!

Tips for the best result
- If you want, you can iron the banner on a low heat setting and on the backside of the banner before adhering it to the MDF.
- If you want to work with something lighter, foam board will work in place of the MDF, however you may need to anchor it if there is any wind.
FAQs
Do I need to put a brace or anchor behind the book backdrop?
No, if you use MDF or wood, you should be fine. If you try this with foam, you will need to anchor it with something to make sure it doesn’t easily fall down.
Fairytale Book Background
Whether you are doing a Disney Princess theme, a Fairytale theme for a teenage, or a Once Upon a Time theme for your little princess like I did, this storybook background is the perfect way to make the party extra special.


Read the Comments +