


Have you ever wondered how to make a DIY Champagne wall or Cupcakes & Wine wall (see below)? Well look no further, because in this tutorial, I am going to show you step-by-step how to build one. Plus, I will also give you all the materials and measurements you need in the plans below. So let’s get started!
*This post includes affiliate links.
AMAZON LINK WITH ALL THE ITEMS YOU NEED FOR THIS PROJECT-> HERE

I’ve been wanting to make a champagne wall for awhile now so I figured this was the perfect time to try it since I’ll be having a small holiday gathering this year. The best part about this project is it doesn’t take a lot of wood and it’s a quick build. It’s also very beginner friendly and great to use for for Christmas and New Years. if you’re not into glitz, you can always skip adding the glitter mesh and keep it all wood or paint it a color.
Why you’ll love this project
- Quick To Build: There are only 8 simple steps for this project, so you can have it finished quickly.
- Beginner Friendly: This project, like most of my projects, is beginner friendly. The cuts are easy, and the small size makes everything easy to work with. Plus, the tools needed are tools every beginner DIY’er should have on hand.
- Versatile: This is not just good for Christmas and New Years, but you can also customize it for baby showers, wedding showers, and adult birthday parties!
- Free You Up: A champagne wall is the perfect way to serve your guests drinks without having to be the one who serves them.
- Free up space: With this diy project, there is no need for a big fancy bar, so it actually frees up space for you and your guests to celebrate and have fun.
Having a party soon and need party decor ideas? Then check out some of my other projects: DIY Foldable Mobile Bar, DIY concession Stand Tutorial
What is a Champagne Wall?
You can find big, over-the-top, fancy champagne walls all over TikTok and IG right now. They are essentially a large wall built from plywood or some other preferred type of wood that can hold filled champagne glasses at a party. And they are perfect for any type of party form wedding showers, to outdoor birthday parties. Basically any party where people may drink champagne.
But the thing is, I didn’t need a big one like I kept seeing on social media. I just needed a small tabletop wall to hold champagne for my small holiday gathering. So I took a different approach and made a cute little tabletop champagne wall instead. It was perfect for my party and am sure you will love it too.
So let’s get into it. Below you’ll find the materials and cut list. Feel free to tweak this design however you’d like.
MATERIALS
3/4” thick plywood
2×4 wood
1×4 wood
Screws (1-1/4” and 2”)
Champagne light sign (optional)
1 inch hole drill bit (only if you’re using the light up sign)
Glitter mesh (I purchased mine from At Home but any craft store has it)
Mod Podge & foam brush (if covering your wood with mesh)
Wood glue
TOOLS NEEDED
Drill and screwdriver
Circular Saw/Miter saw (unless you get wood cut at store)
Nail gun (optional)
CUT LIST
3/4″ Plywood – Cut one piece 29″H x 24″ W for holders to go on
3/4″ Plywood – Cut one piece 25″H x 8″W for the base
2×4 – Cut it at 19.5″ long for the brace
1×4 – Cut it at 20″ long for the brace
How to Build A DIY Champagne Wall
(Steps and Pics)
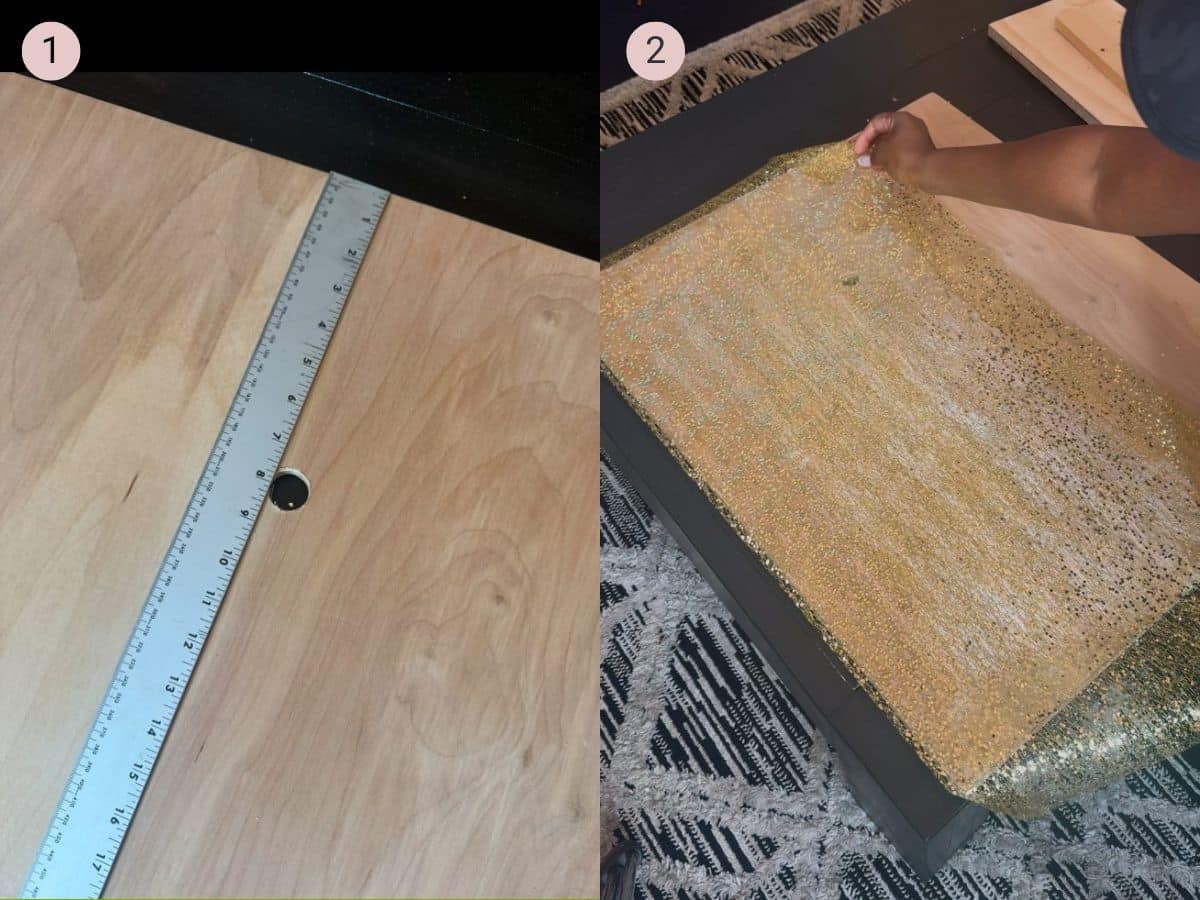
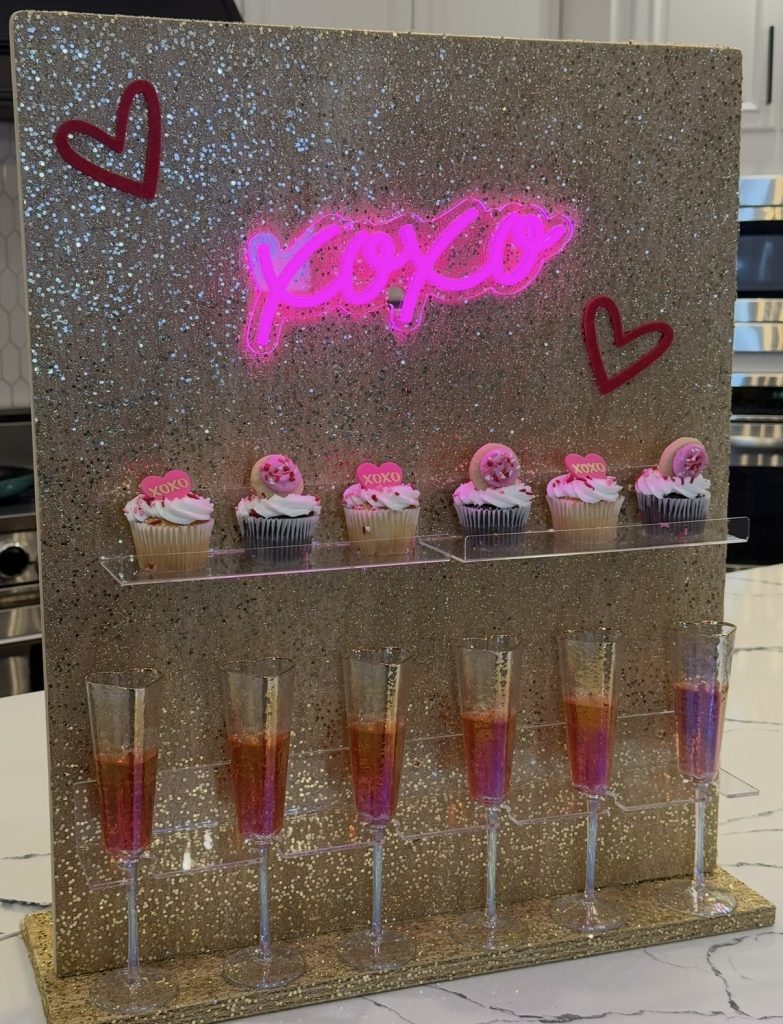
Step 1: Once you have all your wood cut, grab your biggest piece of plywood and cut a hole in it using your 1 inch hole drill bit. You want to make sure you place it so it corresponds with where you want to add the Champagne Light Sign if you’re using that. I positioned my hole about 8 inches from the top. Be sure to center it to match the sign’s plug. *Disregard this step if you aren’t using light up sign. (Image 1)
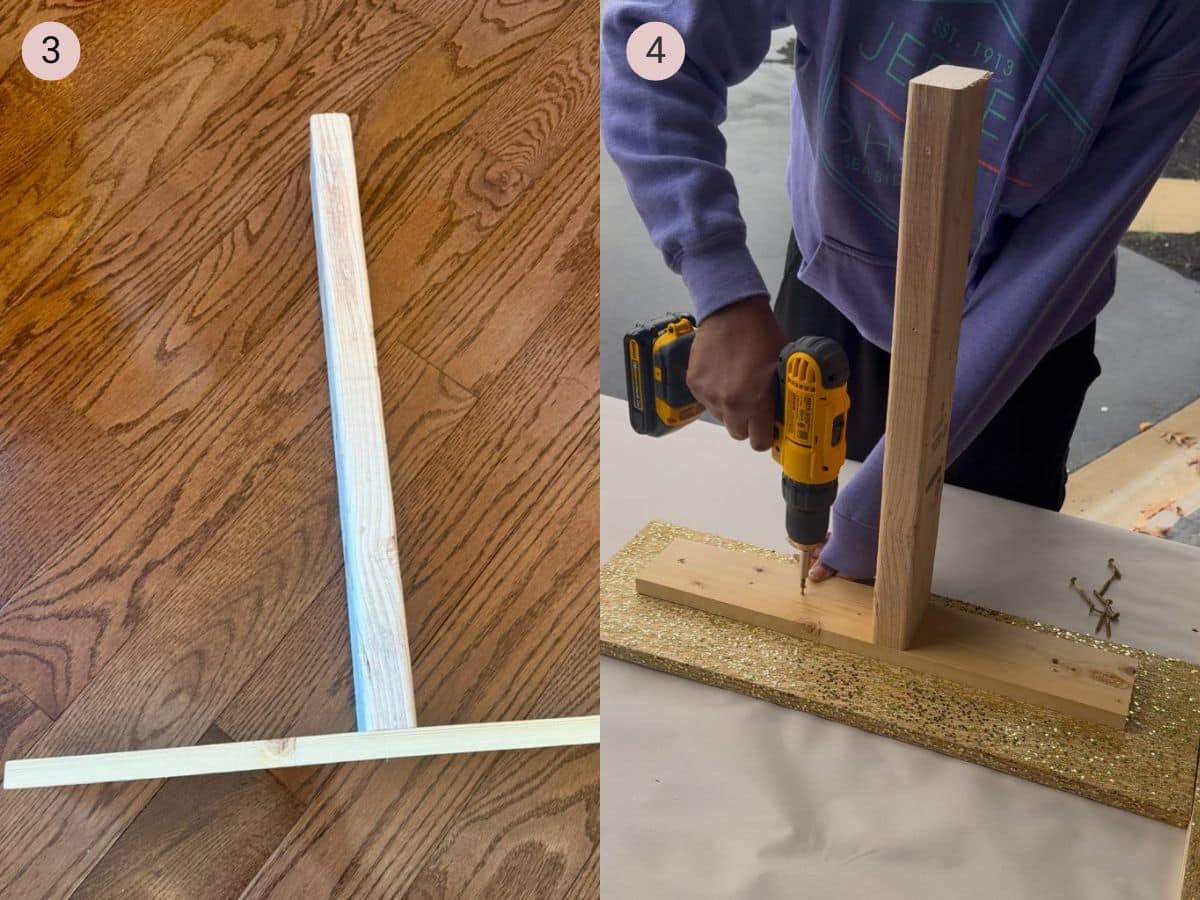
Step 2: If you plan to cover yours with glitter mesh, this is when you’ll need to grab your Mod Podge and a foam brush. Cover the plywood with Mod Podge then place glitter mesh over it. Using glitter mesh is a great alternative to getting that blingy look without having to douse the whole thing with glitter. Once you cover it, do a coat of Mod Podge over top of mesh. This will seal it. If you’re not familiar with using Mod Podge, the consistency is like Elmer’s glue. And don’t worry about it looking milky white, it dries clear. (Image 2)
***You’ll repeat Step 2 with your 25×8″ plywood base piece as well. Once they are done, set them to the side to let them fully dry. The drying time depends on how much glue you use
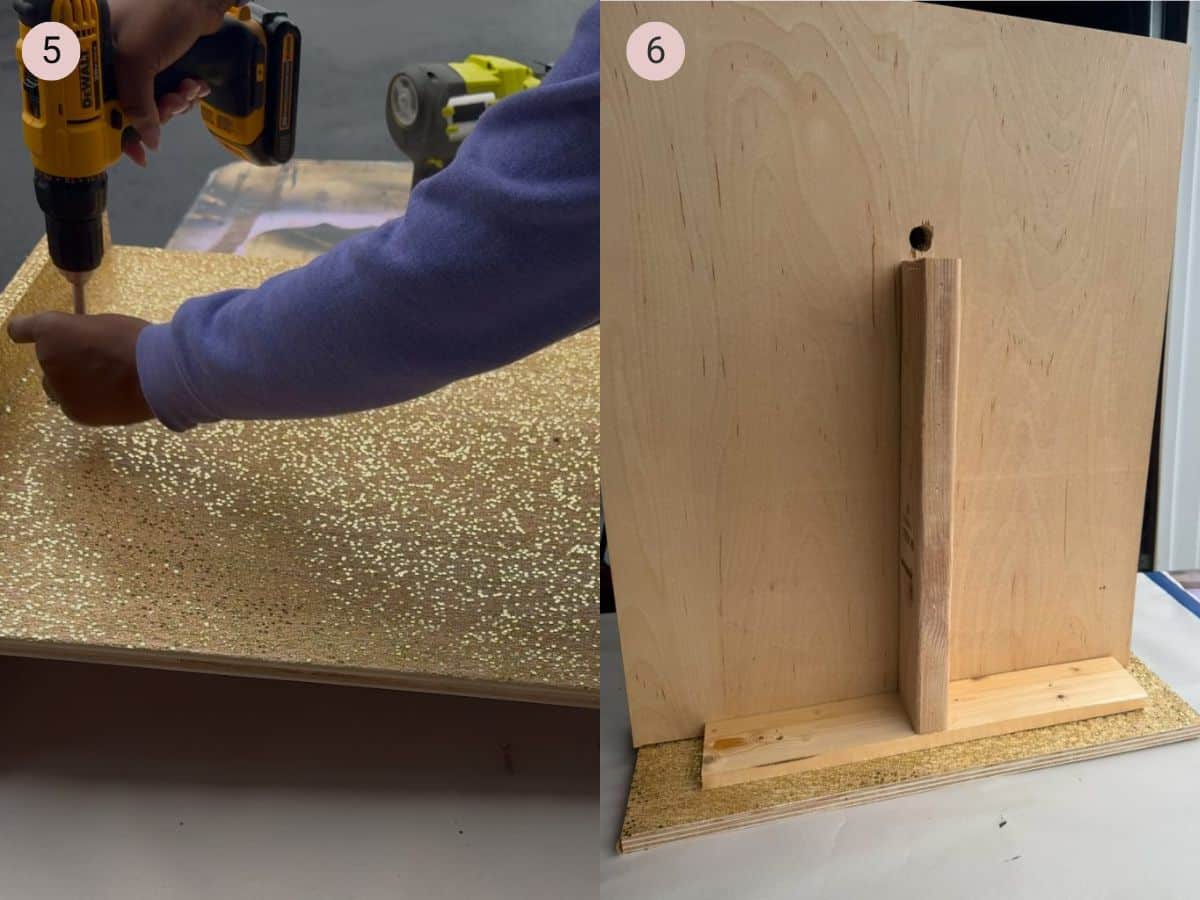
Step 3: While those pieces are drying, work on your “ T ” brace. This will hold the front board up. To make this, you’ll use two – 2 inch screws and screw your 2×4 into your 1×4 base as shown below. Add wood glue in between the pieces of wood and put screws in from bottom (Image 3).
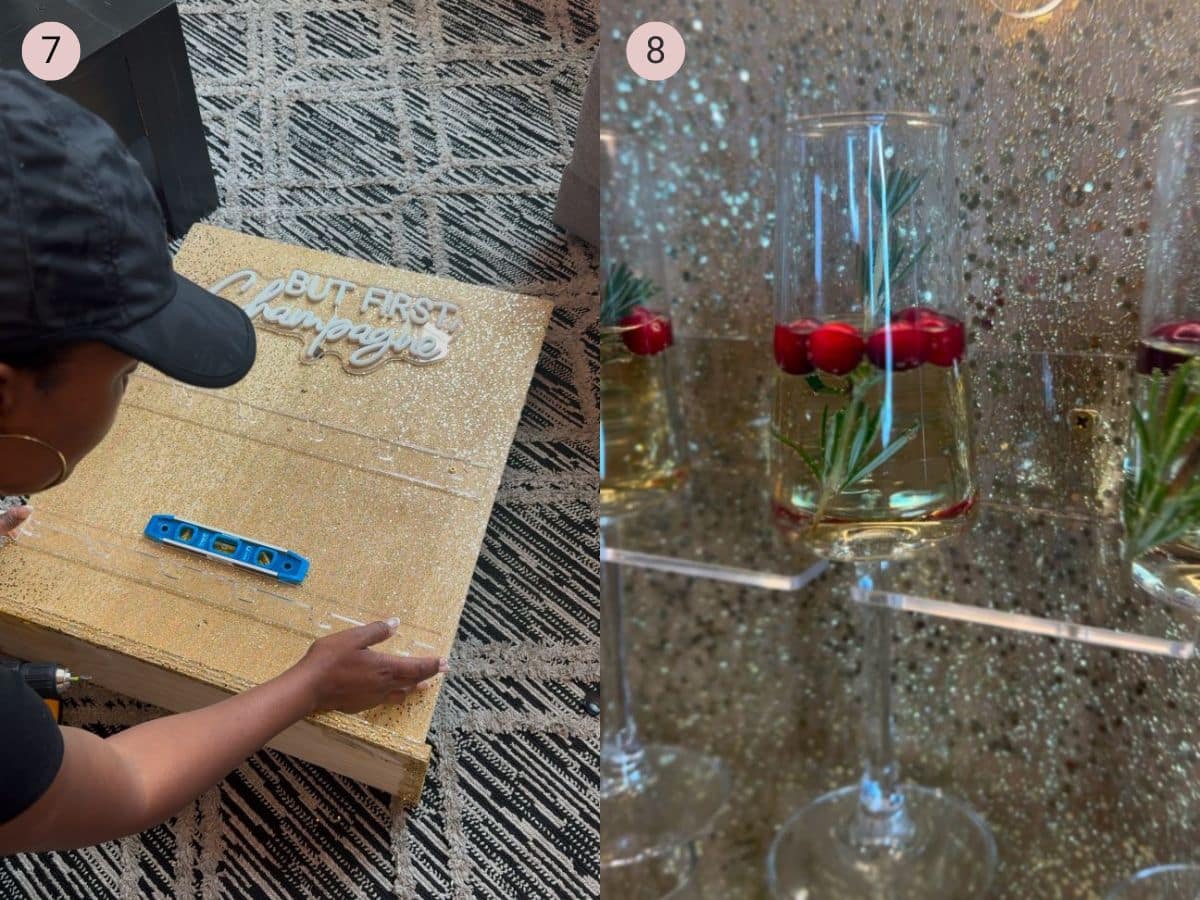
Step 4: Next take your T brace and screw it into your stand base (the 25×8″ piece of plywood) as show below. I used 2 screws on each side. Try to make it center. I didn’t realize mine wasn’t centered until after I did it and I didn’t feel like correcting it lol (Image 4).
Step 5: Now it’s time to add your big piece of wood to the front of the “T” brace. Secure with a few nails at the base from the front. Then add two or three 2 inch screws from the front down the center. Make sure your screws are going directly into your 2×4 on the back (Image 5 and Image 6).
Step 6: Now it’s time to add your light sign and your wine holders. You can position them where you would like them to go but make sure you use a level to ensure they are installed evenly (Image 7).
Step 7: Add your filled champagne flutes and you’re all done! Since it’s the holidays, I went with Prosecco with cranberries and rosemary sprigs in each glass. So cute & festive! 🙂 (Image 8)
Tips for the best result
- Add your own flare: If you like flowers, add them! If you want to make it less sparkly, add less glitter! Remember this is your champagne wall, so use my plans, but customize it to your liking.
- Order supplies online: Ordering things online can speed up the process and take the overwhelm out of walking through a large home improvement store with loads of options. I have liked things in the above sections to make it even easier for you!
Other Champagne Wall Ideas
- Choose any type of signage you like for your champagne wall such as “Cheers”, “Welcome”, “Baby Shower”, or “Wedding Shower”.
- Plan on making it bigger? Just double these diy champagne wall measurements. However, I recommend using a more sturdy wood for the construction such as regular wood or even a pegboard.
- Planning on serving breakfast? Make this a mimosa wall! All you have to do is place orange juice in a beautiful pitcher, then set it next to this tabletop champagne bar.
Ways to make this project even easier
- Have your wood pre cut at the home improvement store
- Order everything you can online (here is the list for this project)
What else can you use a champagne wall for?
The reason this is a champagne wall diy, and not something you buy online, is so you can make it your own, use it in various ways, and really have fun with it. Here are some other uses for this champagne bar:
- Baby Shower
- Wedding
- Wedding Shower
- Birthday Party
Want to try a different project that you can customize for one of these parties? Then you may like my: DIY Candy Wall, How to Make a DIY Outdoor Movie Screen, How to Make a DIY Dessert Cart
FAQs
How many glasses does a champagne wall hold?
It will depend on how big you make the wall, but the standard is between 12-24 glasses. This particular one will hold 12 glasses if you follow my champagne wall plans.
How big should a champagne wall be?
A champagne wall can be as big as several feet tall and wide, to being just 1 foot tall and wide (closer to mine). The point is, you should make the champagne wall big enough to server all of your guests champagne.
Why is my champagne wall falling over?
More than likely, you have not braced the wall well enough. If you make the plans bigger, you will need more bracing behind the wall as well as a sturdier type of wood to make the wall besides plywood.


Read the Comments +