


What else could you want on a movie night? How about popcorn, candy, and a fun diy concession stand to hold it all! This mini concession stand is perfect for a birthday sleepover or any family movie night. I can’t wait to show you just how easy this beginner project is!

Why you’ll love this project
- Beginner Friendly: The plans for this Concession Stand DIY are easy to follow and easy to build with a few materials and tools every beginner should know and have.
- Small Size: The small size is perfect to not take up too much space wherever you decide to use it.
- Fun Theme Prop: Whether this is for a themed birthday party or a family night in, this themed prop makes your home theater feel like the real thing!
Looking for more beginner friendly fun family project ideas? Try out some of these: How to make a DIY Dessert Cart {aka Candy Cart}, How to Build a DIY Candy Dispenser Wall for a Party, How to make a DIY Outdoor Movie Screen
Why I made this DIY Concession Stand
Recently, I hosted a girls movie night and decided to make a concession stand for the theme. I had so much fun making this one ya’ll! Like I couldn’t wait to finish it so I could see the final result lol.
Now, this is a very easy build because you’re just building a box with 2 sides, a top and bottom. But if you want to add the extra pizzaz with trim & lights, you’ll need to do a few additional steps beyond building the box.
So let’s jump into this tutorial!
Materials Needed
- 2 – 1 x 12 x 10
- 1 – 1 x 5 x 10
- 1 – 1 x 2 x 6
- Paint of your choice
- Optional (only if you want to add trim and lights):
- Trim
- Lights (Get the ones I used here)
- Hot Glue Gun
Tools Needed
- Nail Gun (this is the one I use but any brand works)
- Drill
- Spade bit (only if adding lights. You’ll use this to make the holes) Get it here
Cut List
- From your first 1 x 12 x 10 : Cut 2 pieces 38″ long (sides of stand) & 1 piece at 40″ long (bottom of stand)
- From your second 1 x 12 x 10: Cut 2 pieces 40″ long (shelves) & 1 piece 44″ long for top
- From your 1 x 5 x 10: Cut 2 pieces at 38″ long & 1 piece at 32-5/8″ long
- From your 1 x 2 x 6: Cut 4 pieces at 11 inches each
How to Make A DIY Concession Stand
- Grab your 2 pieces of 1 x 12 that are 38″ long and 1 piece that is 40″ long and attach them to form a U. Your 38″ pieces will be the sides of your stand and the 40″ piece is the bottom. Use wood glue & nail gun to do this and add a few screws for added security (Image 1).
- Next step is only if you plan to add lights. If you don’t want to add lights, you can skip this step. Grab your 1 x 5s now and your 1 inch spade bit. You’re going to now add your holes. I made the space in between the holes around 5.5″ but it’s not exactly that spacing between all the holes so you’ll have to eyeball it and set it to your liking (Image 2).

3. Once you make all the holes in your 3 pieces of 1×5, you’re going to attach them to the frame using a nail gun (Image 3 & 4).
4. Paint the stand.

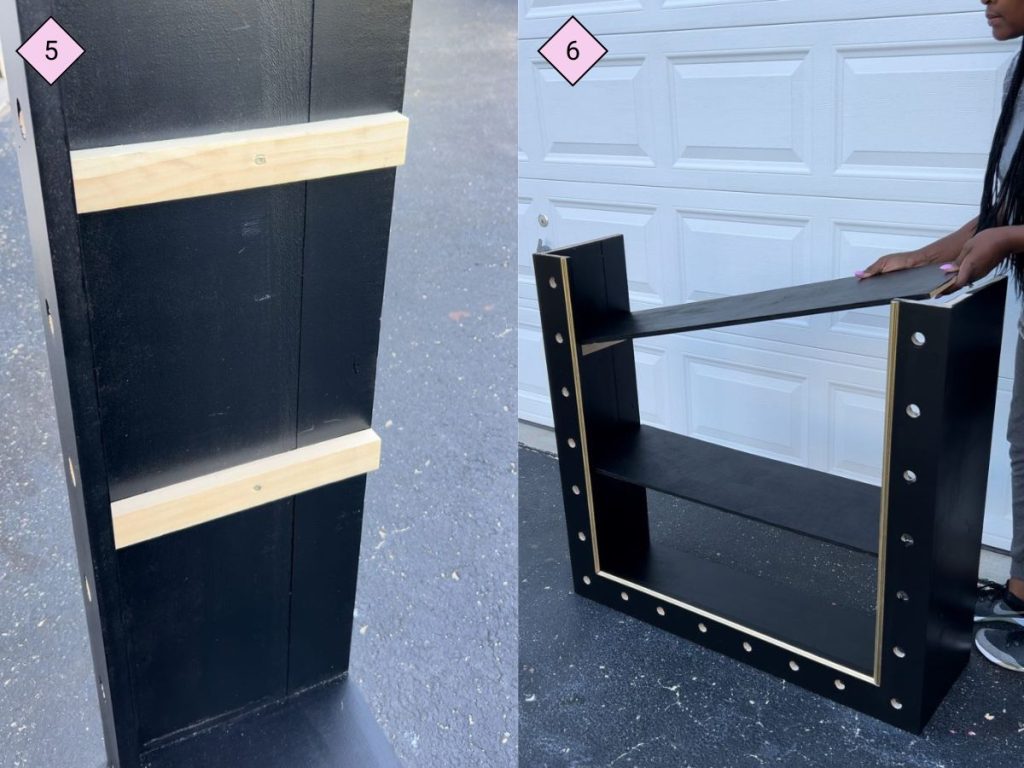
5. Add 1 x 2 pieces inside the frame. These will hold the shelves up. Use a screw to attach. It’s totally up to you how much space you want in between each shelf or if you even want to add an additional shelf. My first shelf starts about 9.25″ from the top (Image 5).
6. Add shelves and pop a few nails into your 1×2 slats on the inside of frame to secure (Image 6).
7. Add trim. Trim is optional but I do think it gives it a finished look. I also spray painted mine gold before attaching (Image 7).
8. Add lights. I purchased the battery operated lights from Amazon thinking I could just untwist them, pop them in, and twist them on from the other side. Unfortunately, the wood is too thick so I ended up just using hot glue to attach them to both sides (Image 8).

9. Add your countertop piece of wood. In these instructions, I’m telling you guys to use a piece of your 1×12 for the counter top but since I had a scrap piece of plywood, I actually just used that and cut it down to 44 x 12.5″. If you want more of an over hang, I’d suggest doing that. It’s not necessary though.
10. Add your candy & popcorn to your shelves, turn the lights on and you’re done! I added a few cute movie night props and a red carpet rope for some added effect and it made movie night such a hit!! GET THE ADDED PROPS HERE.

Tips for the best result
- After adding the lights, you’ll need to use some kind of tape to tape down all the wires so they don’t show.


Read the Comments +