


Why pay for someone else to upholster your bench when it is so quick and easy to do it yourself? In this post, I will show you how to upholster a bench and also how to build your own frame if that is something you want to attempt. Overall, this is a super simple project perfect for beginners who want to DIY their home decor. So let’s get started!

Why you’ll love this project
- Budget Friendly Option: Upholstered benches can be really expensive. By building and upholstering yourself, you save a ton of money.
- Perfect for Beginner DIY’ers: Upholstering a bench is incredibly easy. It is just your choice of material, batting, and some staples. Even building this bench frame is just a simple box with 5 pieces of wood you can have pre-cut for you at the home improvement store.
- Customized Home Decor: Many times it is hard to find an upholstered bench I like. So by doing a diy build and upholstery of this bench, you get to choose your own shape and fabric so it is perfect for your style.
- Versatile skill: Knowing how to upholster is a great skill for projects down the road. Whether you want to build something new to upholster or use this skill to reupholster (or recover) a bench at a later date.
Love building your own style into your home decor? Then you will love some of my other projects like Designer Coffee Table Dupe – TUTORIAL, How to build a Porch Planter Box
Why I’m doing this project
Custom upholstered benches aren’t cheap but it’s okay because guess what? You can make your own! So if you’re ready to make a professional looking DIY upholstered bench that looks like you actually bought it from the store, you’re at the right place! This is definitely a beginner friendly project. You do need a few supplies including a sewing machine to do it exactly like mine but fret not if you don’t have a sewing machine. You can do the NO-SEW method to wrap yours and still end up with a great bench! So let’s get started.
Upholstery Bench Seat – Two Part Project
If you want to build the entire bench: This DIY project is a two-parter. For those who want to build everything from beginning to end, including the bench seat frame, the bench upholstery, and adding your own legs, then read through the whole post.
If you just want to know how to upholster a bench: If you are just doing the upholstery part of this project, skip down to the “Materials needed for Upholstery” section
Materials Needed for Bench Frame
***If you are just doing the upholstery part of this project, skip down to the “Materials needed for Bench Upholstery” section
- 3 – 1’x8’x4’ boards
- 3/4″ thick plywood -2’×4’ ft
- 1/4″ thick plywood – 2×4 ft
- Screwdriver or drill for screwing in legs
- Nail gun (optional)
Materials Needed for Bench Upholstery
*This post may contain affiliate links meaning I get a small percentage from each purchase.
- Upholstery foam (3 inches thick)
- 2 yards of upholstery fabric of your choice (try to stay away from fabrics that are too thick, they can be harder to work with. Likewise, stay away from fabrics that are thin like 100% cotton fabrics)
- Batting (72″x90″)
- Staple gun and staples (I recommend getting a corded or cordless staple gun, your hands will thank you. Manual staple guns hurt after awhile, but they are cheaper)
- Spray glue for foam (I use this but any spray glue works)
- Scissors
- Electric knife
- Sharpie marker
- Sewing machine & straight pins (No-Sew Method doesn’t need these)
Cut List (If building bench frame)
- Three pieces of 1x8x4 ft
- 3/4″ thick plywood -2×4 ft
- 1/4″ thick plywood – 2×4 ft
Variations and Substitutions:
No-Sew Method:
- While I didn’t do this method, it’s a really easy option if you don’t want to sew. To neatly finish the corners, fold the fabric as you would when wrapping a present, then staple under the bottom, trimming any excess fabric if necessary. There are tons of YouTube videos on the no-sew method. I’ll add a link to this post if I come across a really good one.
- Secure the corners with additional staples.
- Trim any stray threads and inspect the bench for any loose staples or fabric.
How to Build an Upholstered Bench
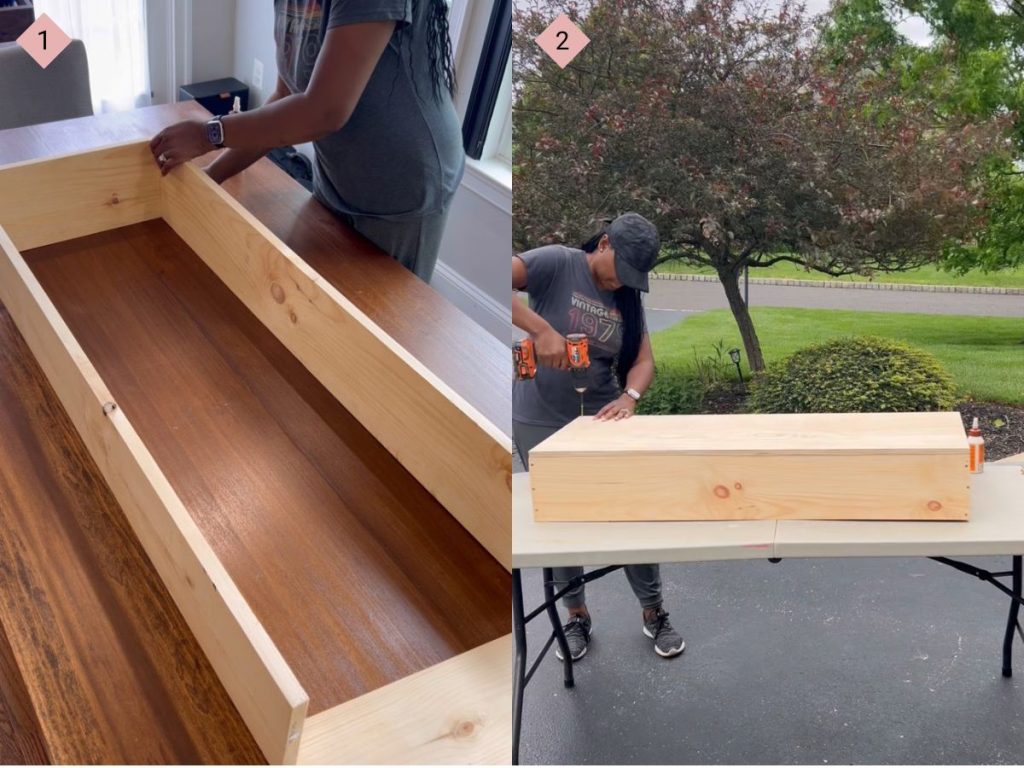
- Lay out your wooden boards on a flat surface as shown below and attach with screws (Image 1).
- Next, using your screws, attach your sheet of 3/4″ plywood to one side, then flip over (Image 2).
3. Now grab the other piece of 1/4″ plywood. Place the board on top of the board and use your marker to trace it.
- Once you’ve marked it, grab your electric knife and slowly cut your foam. It doesn’t have to be perfect since it’ll be covered up but try to make your cuts as clean as you can (Image 3).
- Once your have cut the foam, you can go ahead and attach the 1/4″ plywood sheet to the frame which will create a box (all sides should be now closed up)
4. Secure the foam to the board using adhesive spray or upholstery glue. Allow it to dry completely before proceeding (Image 4).

5. Lay out the batting over the foam-covered board, ensuring there is enough excess to wrap around the edges. Secure the batting to the underside of the board using a staple gun, pulling it taut as you go. Trim any excess batting (Image 5).
6. Set your newly made bench frame on a clean surface and drape it with the fabric you intend to use. You should drape the fabric so the “wrong side” or “inside” of the fabric is showing in order to do this next step (Image 6).
- Starting from one side, pull the fabric over the batting and foam, smoothing out any wrinkles or creases as you go.
- If you are sewing your edges, now is the time to grab your straight pins and pin along the edges where you’ll sew.

7. Once you’ve sewn up the edges, you can turn the slip cover you just made right side out and put it over your padded box. Secure the fabric to the underside of the board using a staple gun, pulling it tightly to create a smooth finish. Staple along the edges, leaving the corners for last (Image 7).
8. Take your legs and the screws they come with out the package and secure to the bottom of bench. I spaced my legs about 5-1/4″ from the ends of bench but you can space them however you like (Image 8).

Turn your bench upright and VOILA! You have just made your own upholstered bench!
Love this beginner friendly project? Try out some of these as well: DIY Easy Peezy Console Table (TUTORIAL, How To Make A DIY Projector Screen Frame {for outdoor movies!}
Tips for Best Results
- Choose a thick fabric made for upholstery. Thinner fabrics will not hold up to the wear and tear the bench will see over the years.

FAQ’s
How do you staple fabric to a bench?
First, turn the bench over. Pulling the fabric taut over the edges of the padded bench seat, hold the fabric in place and press the staple gun head to the fabric. Holding down with a bit of force, pull the staple gun trigger to release a staple into the bench fabric.
How do you do the corners when upholstering a bench?
When upholstering a cushioned seat, you will want to wrap the corners of the bench like you are wrapping a present. Make sure your folds are tight and pin them in place until you have placed the fabric over the bench and attached it.
How much fabric do I need to upholster a bench?
To calculate the amount of yards of fabric you will need, multiply the length and width of the top of the bench, multiply the length and width of each side of the bench, add all those numbers together, then divide that amount by 36.


Read the Comments +